If you’re someone like me who tends to forget things at the end of a meeting, it can be hard to remember what happened during the session. In this case, the meeting notes are the only way to reproduce the discussion. But going through an hour’s worth of meeting notes can be exhausting. This is where transcription can make the process easier.
Transcribing a long meeting recording means uploading your audio to a remote server, relying on cloud processing, and third-party services with potentially sensitive conversations. While cloud transcription services are convenient, they come with a number of trade-offs. While dealing with the same problem, I came across Whisper, an open source speech-to-text model from OpenAI released under the MIT License.
Native AI models are changing the equation, and modern GPUs today are powerful enough to natively handle large models of sufficient size. I already had Whisper and a capable GPU on my computerI built a little dashboard around it OpenAI’s speech-to-text model works completely offline. The results were surprisingly quick. A 30-minute audio clip was rendered in less than a minute without making any external API calls.

Running Whisper natively is faster than most people expect
A 30-minute recording is processed in less than a minute

It is generally assumed that transcription always requires cloud infrastructure, and this was mostly true when the models were large and slow. Today the situation is very different; modern GPUs are more powerful and native models are significantly optimized. Local speech-to-text models can now process an hour of recording faster than real-time playback.
I tried it myself and had surprisingly good results. I used it for context Faster – WhisperReimplementing OpenAI’s Whisper model using CTranslate2 and my computer has a Ryzen 7 7700X CPU and an RTX 4070 Ti GPU. I used a 30 minute, 34 second audio file processed at 55.85 seconds at about 32× realtime.
By translating these criteria into real-world expectations, an hour-long meeting recording can be processed in less than two minutes, and similarly, a 90-minute podcast can be processed in less than three minutes. In other words, the transcription was completed a fraction of the time long before the actual playback.
Download the audio, select a model and see real-time performance
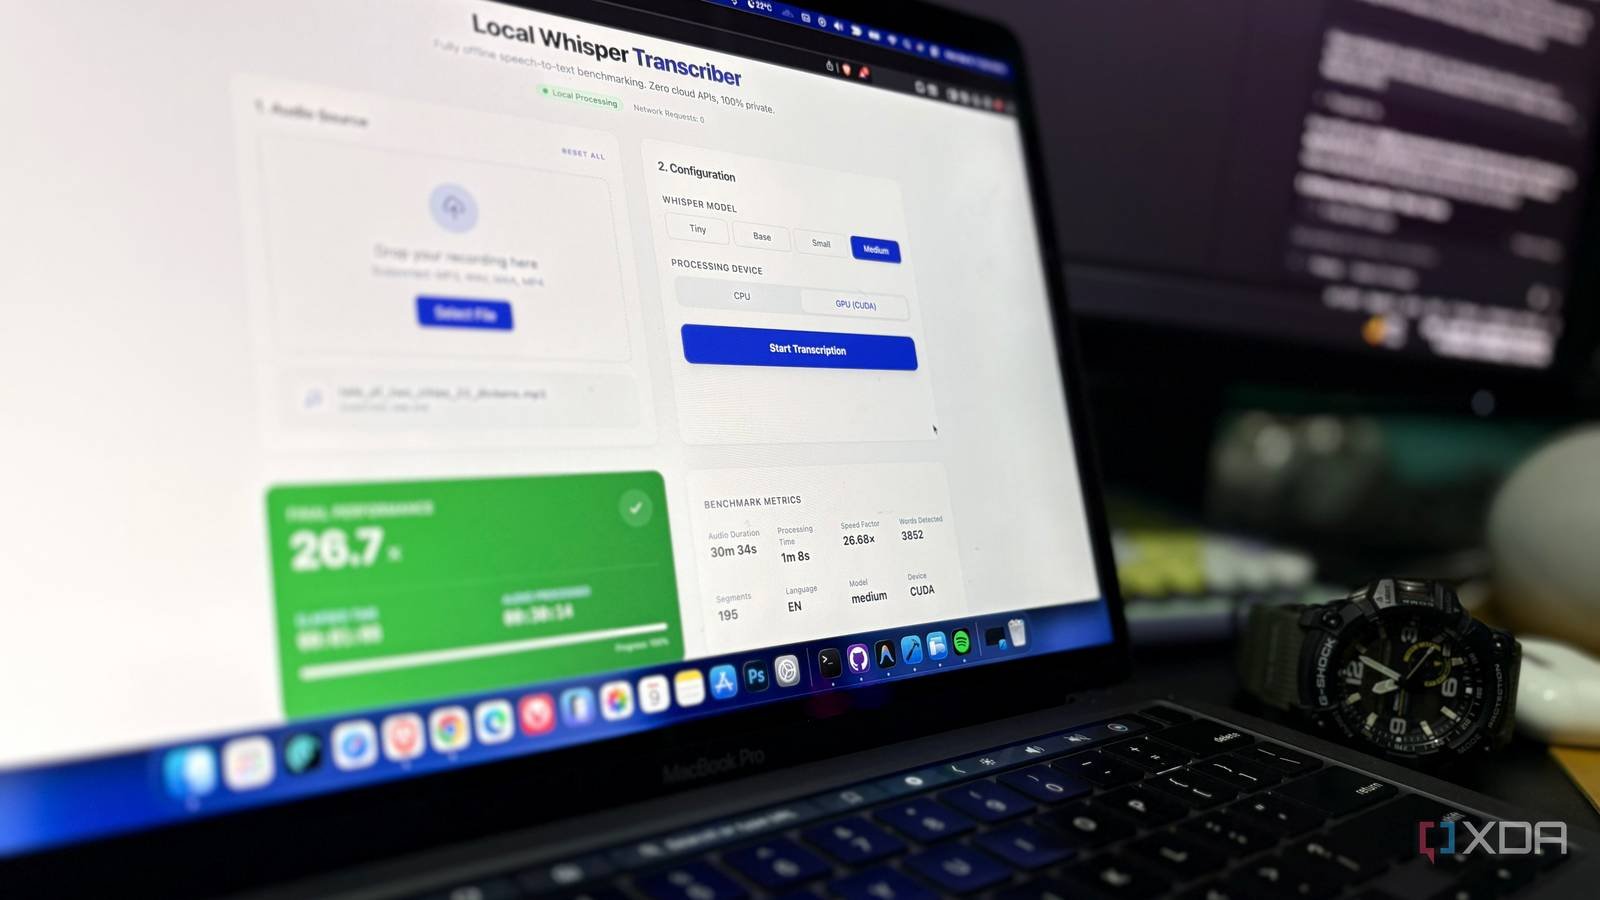
The native Whisper model is easy to use and can even be used in a terminal window, but I made a small dashboard to manage the workflow. The dashboard helped me test Whisper performance locally and monitor transcription speed through a simple interface instead of running CLI commands.
The flow was simple enough. The process starts by either selecting the recording via File Explorer or loading the audio by dragging it into the interface. Next, select the Whisper model you want to use, such as small, basic, small, medium, or large, according to your hardware space. Now choose whether you want to process it via CPU or GPU. Finally, once the process starts, the results begin to appear in real time.
Once complete, you get a structured and time-stamped transcript with key metrics such as audio duration, processing time, speed factor, word count, segment count, language, model and device used. Easy to read and understand; you can even export it in different formats like TXT, SRT and VTT.
The stack behind the project is surprisingly modern
FastAPI, faster whisper and SSE does the heavy lifting

As mentioned earlier, the native Whisper model can also run directly from the terminal, but I have the skills to create apps with good UI and UX. I carefully selected the tech stack to be lightweight and modular. The full stack application uses a FastAPI backend and a React frontend that works in a faster whisper model.
Why I chose the faster whisper model from OpenAI over the original Whisper? This is an optimized implementation of the original model built on top of CTranslate2. It is significantly faster and more memory friendly than the native port of OpenAI, making it practical for native deployments.
FastAPI and the Uvicorn backend facilitate audio downloads, model execution, transcription pipelines, and metrics creation. To detect audio length instantly, I used ffprobe, part of the FFmpeg toolkit, which allows real-time speed calculations. Although Whisper has built-in audio length detection, I chose this approach because it is more reliable and faster.
Built on Vite and Tailwind CSS, the React frontend helps maintain a modern feel and responsive interface. It provides a dashboard while updating metrics in real-time and displaying transcript segments. Server-Sent Events (SSE) and the browser use the EventSource API to allow the speedometer and gauges panel to update in real-time.
A few minor tweaks make Whisper transcripts much easier to read
Simple backend tweaks significantly improve transcript readability

Standard Whisper output and native ML applications it already works well, but a few small practical tweaks made the tool easier to use and read the transcript.
By default, Whisper plays in very small chunks when the speaker is stopped. The output often appears every few seconds, sometimes in broken sentences, resulting in a jumbled transcript. To make the transcripts easier to read, I applied intelligent sentence-based segmentation. Instead of the previous 2-3 second segments, the system now buffers these chunks in memory until an actual sentence ending punctuation appears or a certain time limit is reached.
Here’s what the code looks like:
# Intelligent Sentence-Based Segmenting
current_merged_segment = None

for segment in segments:
   if current_merged_segment is None:
       current_merged_segment = Segment(start=segment.start, end=segment.end, text=segment.text)
   else:
       # Buffer and append the tiny audio chunk
       current_merged_segment.end = segment.end
       current_merged_segment.text += " " + segment.text.strip()

   # Wait for a full stop or a 30-second failsafe before broadcasting to the UI
   text_stripped = current_merged_segment.text.strip()
   if text_stripped.endswith(('.', '?', '!')) or (current_merged_segment.end - current_merged_segment.start >= 30.0):
       results.append(current_merged_segment)
       current_merged_segment = None # Reset buffer
Another big pain point of running a native AI model on Windows is getting the CUDA paths right. Native ML on Windows requires manual setup of CUDA paths and editing of environment variables. To make this more efficient, I used the automatic DLL discovery CUDA approach, which can easily be installed via pip. The script then automatically finds the CUDA libraries installed on your system and includes them in the runtime path.
Here’s what the code looks like:
# Auto-discovery for CUDA DLLs if installed via pip (common for Windows)
if os.name == 'nt':
   import site, os
   # Find all site-packages directories, including Python 3.13 quirks
   packages_dirs = site.getsitepackages()
   if hasattr(site, 'getusersitepackages'):
       packages_dirs.append(site.getusersitepackages())

   for base_dir in packages_dirs:
       for pkg in ('nvidia/cublas/bin', 'nvidia/cudnn/bin', 'nvidia/cudnn/lib'):
           dll_path = os.path.abspath(os.path.join(base_dir, pkg))
           if os.path.exists(dll_path):
               # Dynamically inject into Windows DLL search path and system PATH
               os.add_dll_directory(dll_path)
               os.environ('PATH') = dll_path + os.pathsep + os.environ.get('PATH', '')
Whisper proves that native AI can replace cloud tools
We’ve come a long way from depending on cloud infrastructure to running it entirely on personal hardware without having to connect to external servers for tedious work like speech-to-text generation. By building this small dashboard, I realized that powerful models can become practical tools without the need for a large infrastructure.
For someone who regularly attends meetings, lectures, or seminars, running Whisper locally on their personal hardware can be surprisingly cost-effective compared to cloud-based services. There is no waiting time. No network dependency. No computational stress.