
Google’s ongoing Android 17 beta is now rolling out further feature and technical updates after the main Android 17 release. Here to get the latest updates.
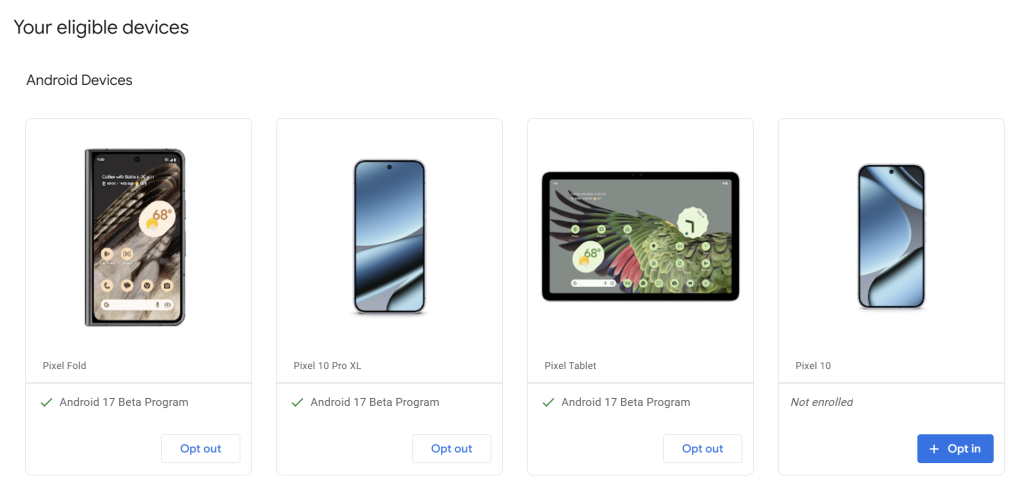
Which Pixel devices can install Android 17 Beta?
Google supports all Tensor-powered Pixel smartphones with Android 17 from 2021’s Pixel 6 series to the latest Pixel 10 phones.
Android 17 Beta is available for all the following devices:
- Pixel 6
- Pixel 6 Pro
- Pixel 6a
- Pixel 7
- Pixel 7 Pro
- Pixel 7a
- Pixel Tablet
- Pixel Fold
- Pixel 8
- Pixel 8 Pro
- Pixel 8a
- Pixel 9
- Pixel 9 Pro
- Pixel 9 Pro XL
- Pixel 9 Pro Fold
- Pixel 9a
- Pixel 10
- Pixel 10 Pro
- Pixel 10 Pro XL
- Pixel 10 Pro Fold
- Pixel 10a
What is the latest Android 17 Beta?
Latest Android 17 Beta as of July 1st QPR1 Beta 6.
Android 17 major release has already rolled out to Pixel devices.
How to Install Android 17 with Android Beta Program on Pixel
You will visit here to install the beta releases of Android 17 google.com/android/beta and “Save” on the device of your choice. Any compatible Pixel with the same Google account (listed above) will be able to connect to the app on this page. Once signed in, you will be able to check for updates on your device to install the update. This usually takes from a few minutes to an hour, however can sometimes it takes longer. You can also opt out of future updates from this page.
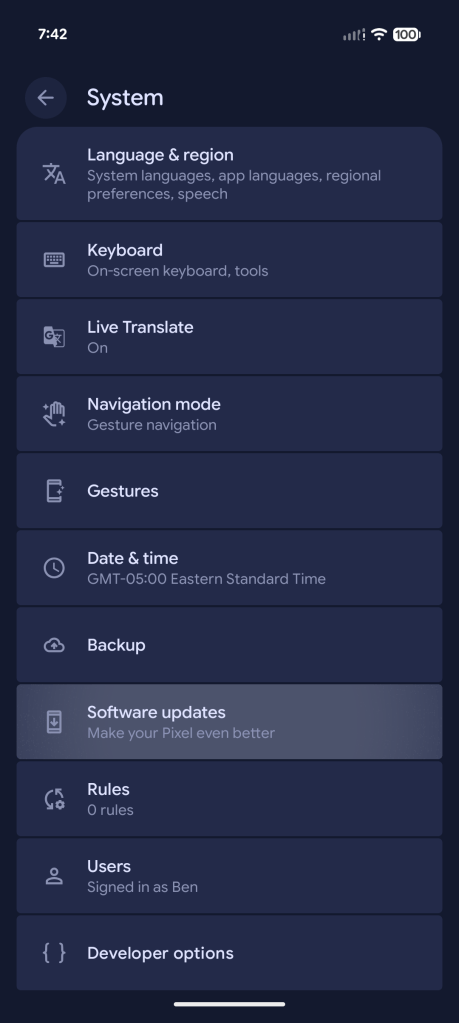
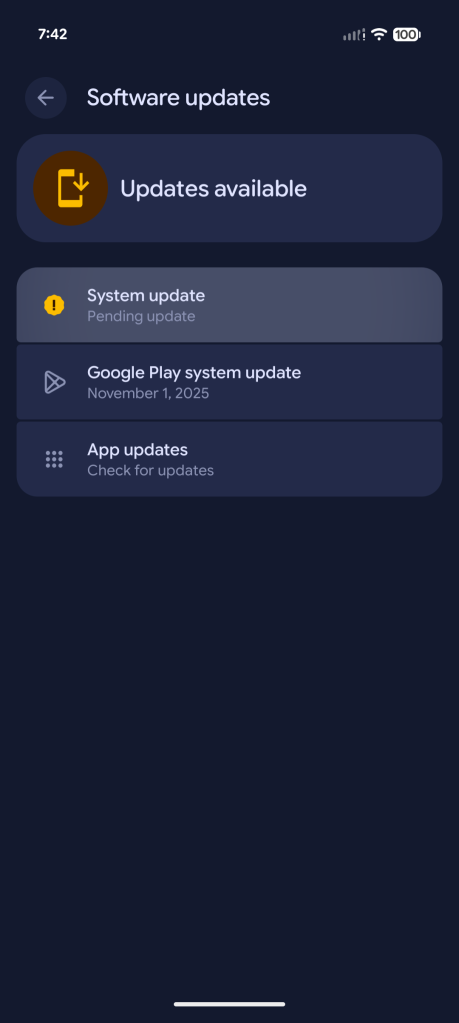
Once installed, go to Settings > System > Software Updates > System Updates and tap the install button.


How to Manually Download Android 17 Beta on Google Pixel
By far the fastest way to get the latest version of Android on your Pixel is to sideload it. It’s a relatively easy process, but you’ll need to install it to do so. Here’s how.
- Download the required files.
- Boot into recovery mode.
- Go to ADB sideload.
- Connect the phone to a computer with ADB tools installed.
- Enter the sideload command.
- Restart your phone.
IMPORTANT: While Android Beta releases are usually safe, it’s in your best interest to either unlock the bootloader or at least turn on OEM Unlock in the developer settings BEFORE installing the OTA file.
1. Download Android 17 Beta files
To get started, you must first download the files needed to flash Android 17 Beta 6 to your Pixel.
There are two ways to do this. First, you can install it Factory imageit wipes your phone and starts all over again. Alternatively, and with a method we’ll explain in detail here, there’s an OTA file that installs your phone to your current version of Android without rooting it.
You can download the beta OTA file from Google’s Full OTA Image hosting site. This site has OTA downloads for sideloading various updates, including Android 17 Beta, to every Pixel and Nexus device, so you’ll need to scroll down to make sure you’ve downloaded the file associated with it. your device. OTA downloads for Android 17 QPR1 Beta 6 are available HERE.
For current Android 17 Beta, only Available in Pixel 6/Pro, Pixel 6a, Pixel 7/Pro, Pixel 7a, Pixel 8/Pro, Pixel 8a, Pixel Fold, Pixel 9, Pixel 9 Pro, Pixel 9 Pro XL, Pixel 9 Pro Fold, Pixel 9a, Pixel 110, Proxel, Pixel 110, Pro 10 Pro Fold, Pixel 10a and Pixel Tablets. you won’t do you can install it on your original Pixel/XL, Pixel 2/XL, Pixel 3/XL, Pixel 3a/XL, Pixel 4/XL, Pixel 4a, Pixel 4a 5G, Pixel 5 or Pixel 5a.
2. Boot into recovery mode
Then you’ll boot your Pixel into Recovery mode. To do this, turn off your phone completely. Then press and hold Power button and Volume down button At the same time until you reach the bootloader page. You’ll know you’re in the right place when you see a reclining Android figure on the screen.
Scroll down using your volume keys Recovery mode. Select this by clicking the Power button. Alternatively, if you are already connected to a computer with ADB, you can use it restart recovery command.
You should now see a smaller Android with an exclamation mark on it. Click here Power button and Volume up button About a second to fully enter recovery mode. Release The volume increases button will send you to Recovery.
3. Go to ADB sideload
Scroll down using the volume keys Apply update from ADB and select with the power button. This will launch a mostly blank screen with text near the bottom guiding you on how to sideload the OTA.
4. Connect the phone to the computer with ADB tools installed
This step is important because it is the only way to transfer the downloaded OTA file to your phone. You should have ADB and Fastboot tools handy. You can download ADB tools from here Android Developers websiteeither by installing Android Studio in its entirety or Command Line tools. you can also use Universal ADB Drivers from ClockWorkModIt can make the process a bit easier on Windows devices.
Personally, I download the tools from the Android Developers website and add the “cmd.exe” shortcut for a quick and easy installation method. For this, you need to put the downloaded software in the same folder as the “cmd.exe” file.
5. Enter the Sideload command
As long as everything is in place, you can now sideload the OTA file. On Windows, make sure your Command prompt is pointed to the ADB tools folder and enter adb sideloading. If you’re on macOS or Linux, do the same in Terminal (use the ‘cd’ and ‘ls’ commands to make sure your Terminal is pointed to the correct directory – Google it if you need help) but enter ./adb sideload. You then need to enter the file name of the .zip folder you downloaded from Google and press enter to start the process.
If everything works correctly, you should see several dialogs on your computer and phone showing the sideloading and installation process.
6. Restart your phone
Once the OTA installation is complete, you will be taken back to Recovery Mode. The last step is to choose to upgrade to the new update Restart now option with the power button.
Questions? Let us know in the comments.
Follow me: Twitter/X, Topics, Blueskyand Instagram
Last updated July 1, 2026
FTC: We use automatic affiliate links that generate income. More.